

As a professional event manager, it’s your job to make sure that events go smoothly from start to finish. That includes doing things like marketing a new event, gathering information about the attendees of the event and managing all the activities, speakers and other forms of entertainment during the event.
One thing that every event manager needs to know is – how do you create a name badge that helps people connect with one another? This sounds like a relatively simple task, but there’s actually quite a bit that goes into making an effective event badge. We’ll go over some general tips explaining what goes into a good quality badge, and how to create one that’s going to perform well in a variety of event situations.
What is a Name Badge?
A name badge is a tag that people wear at events for identification, engagement and data intelligence. It’s a marketing tool for companies and a good way for people to identify one another. They are typically paper or card stock descriptions of the person wearing them, and they are held within a lanyard and a plastic card holder. The finished product simply hangs around an attendee’s neck and serves as an important identifier. Badges aren’t very complicated, but they are made up of multiple parts that all have to come together to do their job properly.
What’s the Benefit of a Good Design
It is crucial to create a name badge that resonates with the event. It makes people more comfortable in talking with one another and also serves as a helpful ice breaker. These badges give little bits of information that guests can utilize to open up conversations and begin networking. It’s difficult to get just the right balance and create name badges of top quality.
10 Tips for Achieving an Effective Name Badge Design
It’s not always obvious how you can make a name badge of great quality, but here’s an overview of the considerations involved and how to make the very best badge that you can for your budget.
1. Choose a Reliable and Adjustable Lanyard
One of the most important decisions that an event manager must make is selecting the lanyard that will be used to create a name badge. It needs to hold the tag in a position that’s going to be easily readable – always. That means it must not swivel around, and it should be height adjustable for different sized people. The best way to avoid the swivelling issue is by using a double-ended lanyard. Take the time to properly evaluate the lanyards for your event name badges, and try them out on multiple people of different sizes if possible.
2. Pick a Font Size that’s Easily Readable
One of the biggest mistakes that prevents custom event badges from being effective is the font size that is just too small. Nobody wants to squint to read a guest’s name, and tags that are too small might prevent people from talking to one another, or make it more difficult at the very least.
3. Select a Font that Works with Long Names
Some guests will have longer names and want them to show fully on the tag. It’s important that your name badge accommodates lengthy names without them coming out distorted on the tag. Choose a font size and font type that accepts longer names without an issue.
4. Include a Job Title
An effective name badge doesn’t just show off the person’s first and last name, it should also give valuable information that helps people open up to one another as well. One important piece of information is the job title. Right under the name on the name badge, you should include a person’s job title. This little bit of information helps like-minded people connect with one another, and can be a valuable tool for forging new relationships.
5. Consider Multicolored Badges
While it’s much cheaper to go with black and white badge designs, it’s more effective to use badges that allow for colors. Whether you want to add a company logo, a description of the event or other styles on the badge, they all show up better when colored. By picking out multicolored tags, designers will have more on their palette to work with, allowing for higher quality unique creations.
6. Make Sure Bar Codes or QR Codes Scan through the Protectors
Effective conference badges all make use of plastic sleeves to keep them in good shape. It’s important to verify that any barcodes or QR codes that are added onto the tags scan effectively through those plastic sleeves. Always test them out with a smartphone or barcode scanner before committing to a design or sleeve.
7. Select a Durable Badge Material
Events often last several days before they end. For that reason, it’s important that the tag portion of effective event badges is durable. It’s best if it is made from a heavy vinyl if it must last multiple days. For single day events, the sticker or thin vinyl tags will often be durable enough. It’s very important to make sure the badge material can handle the task that you have for it.
8. Buy Badges in Bulk
Another tip for creating a name badge set at an affordable rate is to print off the badges in bulk. Try to produce as many as possible at one time to get lower prices. Also consider buying things like lanyards and plastic holders in much greater supply than you need at a time. For instance, when buying holders for a 50 person event, it would likely be much more affordable to buy 500 holders instead of 50. The price will be a bit more initially, but over time the savings will be substantial.
Be careful to avoid buying too few lanyards and plastic covers to go with your badges, or you’ll run the risk of spending far more money than you have to at the end.
9. Getting the Size Just Right
Generally a badge that’s around 4” by 3” in size is just right when you create a name badge that’s going to work at events. It’s important when creating a badge to avoid making it too large or too small. If it’s too large, people either won’t want to wear it, or they will be uncomfortable while doing so. If it’s too small, it won’t show off enough information or it won’t show in a large enough font to be useful. It’s important to get a balance between these two extremes for best results.
To make sure you get a size that you’re going to like using, try out a few different dimensions to see what you prefer the most. Don’t rush when deciding on what to use, and make sure that you test out more than one option before making your final decision.
10. Hire a Good Graphic Designer
It’s not as easy as it seems choosing graphics, fonts and placement of all the details on an event badge. The best way to go when creating one from scratch is to hire a professional to take on the project for you. They will already have some ideas on how to create a quality product and should be able to come up with a custom creation that meets all your specific needs. Don’t rush through the design process and don’t try to do it yourself – unless you have some serious design skills. Instead, outsource the work to save time and get better quality results.
Examples of Excellent Badges
The Singapore FinTech Festival 2016 name badges below are an excellent example of good quality products for a few different reasons:
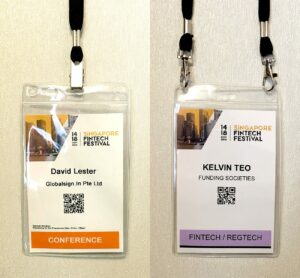
- The first is that the name is clear and the font is easy to read.
- The tag also utilizes two attachment points to prevent it from spinning around during use.
- It’s rich with color and attractive to look at.
- To top it all off, the tag comes with a large QR code that appears to be easy to scan.
This will make it easy for attendees to give out their information and create new contacts quickly.
Conclusion
As an event manager, it’s important to understand the process for creating a name badge. The design of a name badge is simple, but following the above tips will help you create a better quality finished product in the end. Just be careful to make a usable product that’s going to encourage new connections, and you’ll receive nothing but positive feedback regarding the badge for your events. Spend a bit more time deciding on the different elements of an event badge and invest a bit more into the final product before making the purchase. Buying cheap badges might seem like a good way to save money on your event, but it’s actually one of the biggest mistakes that you can make. You won’t save much, and will dramatically lower the experience of the attendees. If anything, it makes more sense to invest more budget into your name badges to make sure that they turn out as good as possible. Start optimizing your GEVME Onsite experiences with effective name badges.
Download for free eBook: Name Badge Design
Latest Updates
🚀 Modern Event Badge Update: 2025 Features & Technology
This section updates the core tips with modern trends.
1. Technology Integration: Beyond the QR Code
The modern badge is a data tool and a digital access point, not just an identifier.
| Feature | Function | Actionable Detail |
| NFC/RFID Chips | Enables contactless lead retrieval (tap-to-connect) and real-time session tracking. Improves Networking Efficiency. | Integrate chips directly into the badge material. Use with your event app for instant vCard exchange. |
| Smart Badge Holders | Contain embedded technology to authenticate identity and track movement. | Allows for gamification (tracking booth visits) and personalized content access. Provides Real-Time Analytics for organizers. |
| High-Density QR Codes | Must be large, clear, and specifically optimized for a quick scan (Tip 6 update). | Link to a personalized attendee profile or a digital document (e.g., product brochure). Test on both light and dark backgrounds. |
2. Sustainability : The Eco-Conscious Badge
Attendees and search engines value environmental responsibility.
| Component | Sustainable Material Option | Value |
| Badge Material | Recycled Paper/Card Stock (300gsm minimum) or Plantable Seed Paper. | Avoids plastic waste, supports green initiatives. Seed paper turns into flowers/herbs after use. |
| Durability | Polypropylene (PP) or rPET (recycled plastic) for multi-day needs if plastic is unavoidable. | Use plastic-free laminates and avoid badge holders entirely (pocketless design) for a compostable final product. |
| Lanyards | Bamboo, Recycled PET (rPET), or Organic Cotton. | Genuinely reduces carbon footprint compared to standard polyester. |
3. Design & Inclusivity: Optimizing for Experience
The physical design must be inclusive and maximize immediate comprehension for a better user experience (UX) and easier AI extraction.
| Design Element | Modern Update (UX) | Impact |
| Inclusivity Field | Add an optional dedicated field for pronouns (e.g., she/her, they/them) underneath the name. | Signals a welcoming, modern event environment. |
| Job Title | Add an “Interest Tag” or a color-coded segmentation bar for quick visual identification. | Allows attendees to identify mutual interests quickly, acting as a conversation starter. |
| On-Demand Printing | Utilize thermal linerless badges and on-site printing systems. | Eliminates bulk waste from pre-printed no-shows and ensures 100% data accuracy for last-minute registrations. |
FAQ’s
Q1: What is the standard and most effective size for a conference name badge?
The most common and effective size for a professional event badge is 4 inches by 3 inches ($4″ \times 3″$).
- Why this size? It provides the ideal balance between maximum readability (allowing for large font sizes) and attendee comfort (not being too large or cumbersome).
- Larger Option: For events with lots of information (maps, schedules, QR codes), sizes up to $4″ \times 6″$ are used, but they can be less comfortable to wear.
- Smaller Option: Smaller sizes, like $3.5″ \times 2.25″$, are typically reserved for evening events or intimate gatherings where networking is less crowded.
Q2: What is the “6-Foot Rule” for badge readability?
The 6-Foot Rule (sometimes called the 15-Foot Rule) dictates that an attendee’s first name should be legible and easily read from a distance of approximately six feet away in a crowded environment.
- Design Tip: This usually means using a font size of 72 point (pt) or larger for the first name.
- Font Choice: Always prioritize clean, thick sans-serif fonts (like Arial, Roboto, or Helvetica) to ensure high visibility and contrast.
Q3: How can I make my event name badge more sustainable and eco-friendly?
- Material: Use recycled paper/card stock or plantable seed paper (which grows flowers/herbs when planted).
- Holders: Eliminate plastic badge holders entirely by using a sturdy, hole-punched cardstock badge that clips directly to the lanyard. If a holder is required, use biodegradable or compostable plastics (like PLA).
- Lanyards: Use Recycled PET (rPET), bamboo, or organic cotton lanyards.
Q4: Should I include a job title or just the company name?
Yes, you should include the job title.
While the company name is essential, the job title provides instant context and a vital networking icebreaker.
- Recommendation: Include the person’s first name (largest), followed by the job title and company name (secondary size), as this is the most actionable information for professional connections.
- Inclusivity Update: Consider adding an optional field for personal pronouns to signal a welcoming environment.
Q5: What is the benefit of integrating NFC or RFID technology into a badge?
Integrating Near Field Communication (NFC) or Radio-Frequency Identification (RFID) elevates the badge from a static ID to a powerful event technology tool:
- Contactless Data: Enables tap-and-go lead retrieval for exhibitors (faster than scanning QR codes).
- Access Control: Provides fast, secure access control for different areas (VIP, sessions) without manual scanning.
- Real-Time Analytics: Allows event organizers to track session attendance and attendee flow, providing valuable data for post-event analysis.
Q6: Should I use magnets or a pin clip to attach a badge?
For guest badges on lanyards, lanyard attachments (like bull clips or j-hooks) are standard.
However, for staff, VIPs, or sponsor representatives wearing sensitive clothing:
- Magnets are the best choice. They offer a secure hold without poking holes or damaging delicate fabrics.
- Caution: Always ensure the magnet is positioned away from sensitive equipment or medical devices like pacemakers.


